
디지털 스테가노그래피는 한 파일을 다른 파일 안에 숨기는 기술입니다. 예를 들어, 매장된 보물 상자가 있는 경우 무해해 보이는 그림 안에 좌표를 저장할 수 있습니다. 육안으로 보기에는 파일이 여느 파일처럼 보이지만, 당신과 당신이 신뢰하는 사람들은 전문 도구를 사용하여 비밀 데이터를 추출할 수 있습니다.
OpenStego (새 탭에서 열림) 는 그러한 도구 중 하나입니다. 이 편리한 무료 오픈 소스 앱을 사용하면 원하는 파일을 가져오고 더 큰 파일 내부에서 임의의 디지털 '노이즈'로 위장하여 파일을 비밀로 유지할 수 있습니다.
In this guide, you’ll learn how to download and run OpenStego, as well as the basics of hiding your very first, password-protected, message.
1. Download OpenStego
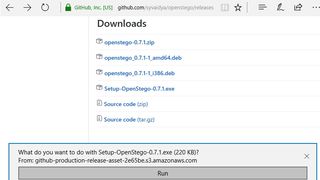
Open your browser and navigate to the OpenStego website (opens in new tab). Click 'Downloads' at the top right. Scroll down to find the right version of OpenStego for your processor e.g. 'Setup-OpenStego-0.7.1.exe'.
Click on the file and choose 'Run'. Windows 10 will ask you to confirm you want to let the app make changes. Click 'Yes'.
OpenStego setup will now launch. Click 'I Agree' on the License Agreement page, check the destination folder, then click 'Install'. Once you see the screen reading 'Installation Complete', click 'Close' at the bottom right. Do not run OpenStego for now.
2. Install Java Runtime Environment
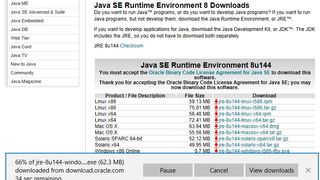
OpenStego is written in Java so you must install the JRE (Java Runtime Environment) (opens in new tab) to load it. Click on the offline installer for your processor architecture e.g. Windows x64 Offline. Choose ‘Run’ once again and click ‘Yes' to allow the JRE to make changes to your computer.
Java Setup will now start. Click ‘Install’ to begin, then ‘Close’.
Click the Start Menu and select ‘Run OpenStego’ in the ‘Recently Added’ section. Windows 10 may start searching for 'javaw.exe'. If so, give it a few minutes to complete then choose to 'Fix' the broken link. OpenStego will now launch.
3. Create your message file
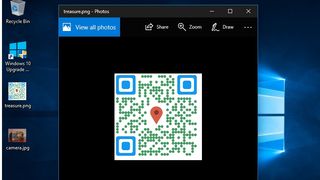
Before using OpenStego, you need to create the secret file you want to remain hidden. There's no restriction on the format of 'message' files – this can be a text document or another image, however it has to be smaller than the cover file it hides inside.
If your file is very large, OpenStego supports splitting it across a number of cover files. However, it's probably easier to encrypt and upload it to a website, then create a text file detailing the URL and password.
See our guide on Encryption Tools for more information.
The example message file above is a QR code containing GPS coordinates of buried treasure.
4. Choose your cover file
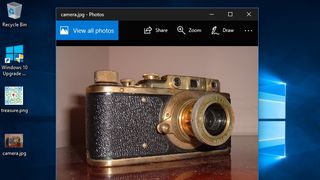
The cover file should be a harmless looking image, inside which the 'message' file will be stored. Give some careful thought to the image you choose. In the first instance, make sure it's bigger than the 'message' file.
Try to use a picture you've taken yourself. Otherwise, someone could compare the file you produce with OpenStego to the original and work out where data is hidden.
Make sure there are plenty of photos on your computer and that you have a plausible reason for having this one on your hard drive. For instance, if you have an interest in photography or history, you could use a picture of a vintage camera.
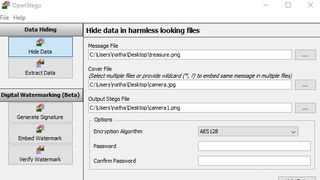
5. Configure the file settings
Once you've chosen your 'message' and 'cover' files, return to OpenStego. Click the button besides ‘Message File’ and select the file you wish to hide.
Next, click the button inside the ‘Cover File’ box. Navigate to the harmless cover file you chose earlier. Click ‘Open’ to confirm.
Finally, click the button inside the ‘Output Stego File’ box. Navigate to the folder where you want to store the output stego file e.g. Desktop, then enter a name for it in the box below e.g. camera1. Click ‘Open’ once again.
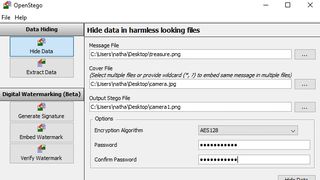
6. Choose encryption settings
Head down to the ‘Options’ box. From here you can choose to encrypt your message file with a password before hiding it inside the cover file. Without the correct password, the data will be irretrievable.
If you wish to do this, click on the ‘Encryption Algorithm’ box first. From here you can choose how to protect your data. The default setting (AES128) is perfectly secure, however you can increase the encryption strength to AES 256 if you wish. (This may slow down the extraction process slightly).
DES is no longer secure, so do not choose it.
Enter your password in the 'Password' field, then again under 'Confirm Password'.
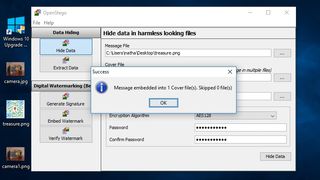
7. Hide your data
Click the ‘Hide Data’ button at the bottom-right of the screen to begin the process of concealing your message file inside the cover file. OpenStego will state it's processing the file, then display a message saying that the message has been embedded. Click ‘OK’.
Next, make sure to erase the original 'message' and 'cover' file securely. This way there'll be no way to retrieve your secret file without using OpenStego and the password if you set one.
Remember that if a malicious user finds OpenStego installed on your Windows PC, they may realise you have hidden files.
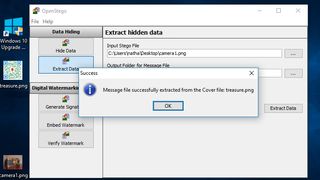
8. Test extracting files
If you want to test if OpenStego hid the file properly, click the ‘Extract Data’ button at the top left of the window.
Click the button besides ‘Input Stego File’ and find the stego file you created earlier e.g. camera1.png. Next, click the button in the box marked ‘Output folder for Message file’ to choose where to extract the 'message' file.
If you set a password earlier, make sure to type this into the password field. Finally click ‘Extract Data’. If successful, you'll see a notification saying the 'message' file has been extracted.
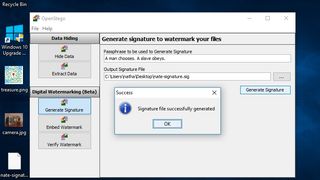
9. Generate signature to watermark files
The downside of using steganography is there's no automatic way to stop someone from replacing your secret file with another. OpenStego tries to prevent this by using digital watermarking.
You can do this through generating a signature using a passphrase, which you can then embed as a watermark into your secret file.
To get started, click ‘Generate’ signature on the left hand side and type in any passphrase in the box marked ‘Passphrase to be used to Generate Signature’.
'서명 파일 출력'이라고 표시된 상자에서 버튼을 클릭합니다. 서명 파일을 저장할 위치로 이동하고 하단의 필드에 이름을 입력합니다.
서명 파일을 생성하려면 '서명 생성'을 클릭하십시오.
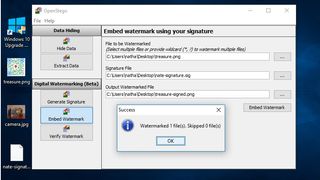
10. 서명을 사용하여 워터마크 삽입
메시지 파일에 서명을 삽입하려면 창 왼쪽의 '워터마크 삽입'을 클릭합니다.
'워터마크할 파일' 옆의 버튼을 클릭하고 워터마크할 메시지 파일을 선택합니다.
'서명 파일'이라고 표시된 상자에 대해 동일한 작업을 수행하고 방금 만든 파일을 선택합니다.
마지막으로 '워터마크 파일 출력' 옆의 버튼을 클릭하고 새 메시지 파일의 위치와 이름을 선택합니다. 계속하려면 '워터마크 삽입'을 클릭하세요.
OpenStego를 사용하여 서명을 확인하려는 사람이 있으면 서명 파일 사본이 있는지 확인한 다음 '워터마크 확인'을 클릭하도록 요청하십시오. 여기에서 워터마크가 있는 이미지를 귀하의 서명과 비교하도록 선택할 수 있습니다.