우리는 전 세계적으로 어떤 일의 한가운데에 있고 사회적 거리두기로 싸우고 있지만 친구 및 사랑하는 사람들과 어울릴 수 없을 때 그것을 완전히 잃지 않는 것이 다소 어렵습니다. 그렇기 때문에 Discord와 같은 앱이 이 어려운 시기에 구원의 은혜입니다.
이제 Discord는 PC 게임용 채팅 앱으로 약간의 명성을 얻었 으며 확실히 그렇긴 하지만 모든 그룹의 사람들이 의사 소통하는 데 매우 유용합니다. 친구 그룹이 D&D 온라인 플레이를 좋아하든, 함께 음악을 듣든, 아니면 그냥 멋진 그룹 채팅을 원하든, Discord를 통해 그렇게 할 수 있습니다. 최대 10명과 그룹 영상 통화도 가능합니다!
그러나 Discord는 게임을 염두에 두고 만들어졌기 때문에 가장 강력한 경험은 PC와 Mac에서 찾을 수 있습니다. 모바일 앱(아래에서 자세히 설명)이 있지만 대부분의 기능은 컴퓨터에서 가장 잘 작동합니다.
디스코드 설치 방법
iPhone 또는 Android 기기에서 Discord를 사용하려는 경우 App Store (새 탭에서 열림) 또는 Google Play 스토어 (새 탭에서 열림) 에서 다운로드하면 됩니다 . 그러나 PC에 Discord를 설치하려면 discord.gg (새 탭에서 열림) 로 이동 하면 Windows용으로 다운로드하거나 브라우저에서 열 수 있는 옵션이 표시됩니다.
대부분의 경우 브라우저에서 실행하는 것이 좋습니다 . 물론 몇 가지 제한 사항이 있습니다. 시스템 전체에 푸시 투 토크를 사용할 수 없으며 비디오를 채널로 스트리밍할 수 없습니다. 또한 우리는 전용 앱이 있는 것을 좋아하기 때문에 평소처럼 수많은 Chrome 탭이 열려 있을 때 쉽게 전환할 수 있습니다.
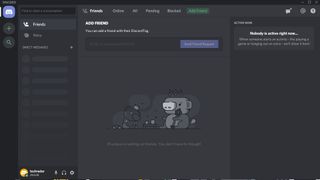
계정 만들기
앱을 다운로드했든 웹 앱을 사용 중이든 계정을 만들어야 합니다. 방법은 둘 사이에서 유사하지만 정확히 동일하지는 않습니다.
예를 들어 웹 앱을 열면 사용자 이름을 선택하라는 메시지가 표시됩니다. 원하는 이름을 입력하세요. 다른 곳에서 사용되는 것에 대해 걱정할 필요조차 없습니다.
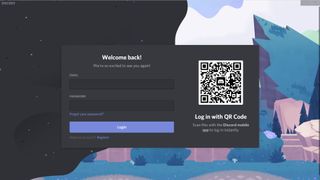
완료되면 이메일 주소와 비밀번호를 입력하여 "계정 신청"을 요청하는 팝업창이 나타납니다. 이렇게 하면 가입한 모든 서버에서 자신의 위치를 유지하고 모든 채팅을 저장할 수 있습니다. 일회성으로 Discord에 가입하는 경우 이 작업을 전혀 수행할 필요가 없습니다. 그러나 권장합니다.
In the app, when you open it you'll be greeted with a login prompt asking for an email and a password. Now, if you already have an account and the mobile app, you can scan the little QR code to instantly log in.
If you don't have an account, you can click the 'Register' link underneath the 'Login' button to create an account. Click that link and it'll ask for your email and you'll have to choose a username and password. Once you do that, you'll have to pass a captcha – which is always annoying. And, then it'll take you to the home screen on Discord.
If you're setting up on mobile, the same process applies: pick a username and password, type them out and you’re in. You can set up two-factor authentication later, if you wish.
Join a server, or create one
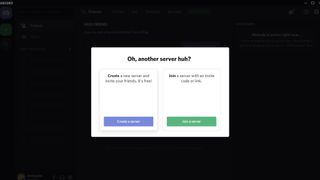
Once you create an account and you're sitting in Discord, you'll probably notice that its a bit like a ghost town. You're going to need to join a server. If you already know someone with a server, ask them to send you an invite link. Once they do, all you have to do to join their server is to click the link, and it'll automatically send you to their server. No extra work on your end.
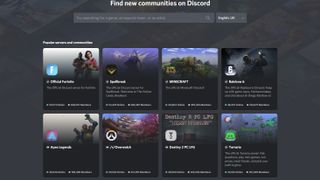
If you don't have a friend inviting you to a server, and you're just trying to like, see what all the Discord hype is about, you can hit the little looking-glass icon on the left-hand side of the screen to open up a server browser. Here, you'll see a bunch of hyper-popular servers listed out, with a search bar up top where you can search for individual games, esports teams, or whatever else may have a community built around it.
If you want to open your own server for you and your friends, hit the plus-sign button to open your own server. Once you hit that, you'll see a dialog pop up on the screen asking you to either create a server or join a server. You can click "join a server" and it'll ask you to enter a invite code, though it's easier to just, uh, click the link instead.
When you click "create a server", it'll transition into a screen where you'll be able to choose a name for your server, along with upload a picture to represent it. Just keep in mind that the size of the picture is limited to 128 x 128 pixels.
Once that's done, you'll be placed into an empty server. You can create new text channels by pressing the plus sign next to "Text Channels" or new voice channels by pressing the plus sign next to "Voice channels" If you want to add new people to your server, you can right click the icon for your server on the left-hand side of the screen and select "invite people". From there, you'll be able to invite specific friends or generate an invite link that you can send to anyone to have them join.
Play around with your settings
Once you're inside Discord and you're ready to hop in a voice server and chat with friends, you should take a second to make sure all your settings are on point. Assuming you're on Windows or Mac, you can click the little cog wheel next to your name on the bottom-left corner of the screen to enter the settings panel.
From here, you'll find settings that will let you change account information, authorized apps, overlay and more. However, you probably won't have to mess around with any of this to start, and where we would focus attention at first would be in Voice & Video.
In our time with Discord, we've had to deal with so many people with audio issues that it's not even funny. So before you even think about jumping into a voice chat, click on the Voice and Video section. Under Input and Output Device, make sure the devices you want to use are selected.
This isn't a hard and fast rule, but in our experience, if you join a voice server with the wrong stuff selected, it's possible you'll have to completely quit out of the program and launch it again in order to get it working right.
There's also an option to select your input mode, from Voice Activity to Push to Talk. If you're just chilling with your friends in the server, having Voice Activity enabled is probably fine: the background noise kind of adds to the experience. However, if you're gaming with friends, we'd advise selecting Push to Talk, to minimize the amount of distracting noises coming in.

Customize your server and more
Discord is an incredibly powerful and customizable platform, which means you can create as advanced a community as your imagination allows. You can add bots that will let your friends level up in the server as they talk more, bots that will play music from YouTube in the voice channels so everyone can listen together and so much more.
Frankly, the possibilities are kind of endless, and we recommend getting a bit of experience with the software before you really dive into this.
For advanced users, Discord doesn't place any real restrictions on what you can do. Our goal here is to get people started with the software, but if you really want to go all-out and create the server of your dreams, that option is definitely open to you. There are servers out there with thousands and thousands of users – giant communities with all the bells and whistles you could hope for. But, if you're just looking to virtually hang out with your friends, you don't have to worry about any of that.
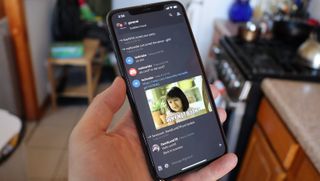
Discord mobile app: streamlined, but full-featured
많은 채팅 앱과 마찬가지로 Discord는 각각의 iOS (새 탭에서 열림) 및 Android 앱을 통해 이동 중에도 사용할 수 있습니다 . 모바일 앱에서 예상한 대로 데스크톱에서와 똑같은 경험을 제공하지는 않지만 가장 필요한 기능은 갖추고 있습니다.
사용자 이름과 암호만 사용하는 경우 이를 입력하고 로그인하면 됩니다. 2단계 인증 (2FA)을 선택한 경우 조금 까다로울 수 있습니다. Google Authenticator, Authy 또는 휴대전화 SMS를 사용하는지 여부에 관계없이 조건을 충족해야 합니다. 백업 코드가 기억나지 않더라도 걱정하지 마세요. 백업 코드는 2FA를 재설정할 때마다 변경된다는 점을 명심하세요.
물론 Google Authenticator 또는 Authy 앱 자체를 통해 2단계 인증에 휴대폰을 사용할 수 있습니다. 어느 버전에서든 사용자 설정 > 계정으로 이동하고 이중 인증 활성화를 클릭합니다. 처음에 2FA를 설정하려면 앞서 언급한 앱 중 하나를 실행해야 합니다. 대신 모바일 앱에서 직접 SMS 인증을 설정할 수도 있습니다(이전 방법 중 하나에 액세스할 수 없는 경우).
Discord 모바일 앱에 로그인하면 인터페이스는 데스크톱 앱과 매우 유사하게 작동합니다. 중앙은 현재 채팅 채널이고, 회원 목록으로 이동하려면 오른쪽으로 살짝 밀고, 채널 및 서버 목록을 보려면 중앙에서 왼쪽으로 살짝 밀면 됩니다. '홈' 버튼 대신 왼쪽 상단 옵션은 다이렉트 메시지용입니다. 대신 앱의 하단 버튼 행에는 대부분의 '홈' 기능이 있습니다. 왼쪽에서 오른쪽으로 버튼을 누르면 채널 및 서버, 친구 목록, 검색, 멘션 및 계정의 '홈'으로 이동합니다.
모바일 앱은 뒤섞일 수 있지만 데스크톱 버전의 기능 대부분을 유지합니다. 이름 변경과 같은 일부 기능은 모바일에 없습니다.
- 친구와 함께 플레이하고 싶다면 최고의 게임용 노트북이 있습니다.