이제 2019년형 AirPods , AirPods(3세대) , AirPods Pro 또는 AirPods Max 가 현재 머리를 장식하고 있는지 여부에 관계없이 Apple AirPod 세트의 자랑스러운 새 소유자가 되셨습니다. . 그러나 당신은 항상 더 행복 할 수 있고 고맙게도 여기서 지출이 완료되었습니다. 맞습니다. 이 목록에 있는 어떤 트릭도 한 푼도 들지 않습니다.
물론 우리는 여전히 2022년 어느 시점에 에어팟 프로 2를 볼 수 있기를 바라고 있지만, 큰 공개를 기다리며 기다리는 것은 의미가 없습니다. 그러니 이 시간을 사용하여 미국의 메모리얼 데이 주말, 영국의 Queen's Platinum Jubilee 축하 행사, 그리고 우리 모두를 위한 페스티벌 시즌을 위해 현재(그리고 실제로 매우 재능 있는) Apple 청취 장비를 최상의 상태로 준비합시다.
1. '뒤에 있을 때 알림'으로 AirPods를 더욱 안전하게 보호
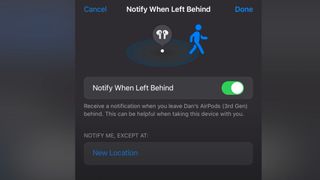
다소 비싸고 아주 작은 새 AirPod가 분실되거나 도난당하는 것을 원하는 사람은 아무도 없습니다. 사소한 범죄자를 제외하고는…
최신 AirPods(AirPods 3, AirPods Max 및 AirPods Pro 포함)에는 '뒤에 있을 때 알림'이라는 특히 영리한 '나의 찾기' 앱 통합 도구가 있어 외출 중일 때 AirPods에서 분리되는 경우(당신은 예를 들어 카페에 두고 온 경우) 즉시 알림을 받게 됩니다.
이 기능을 제대로 활용하려면 iOS 기기에서 내 앱 찾기를 열고 Apple 기기 목록에서 AirPods를 클릭한 다음 '뒤에 있을 때 알림'을 켜야 합니다. 받아라, 소매치기들아!
2. 자동으로 장치 간 전환 – 또는 전환하지 않음
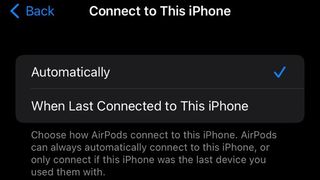
AirPods에는 사용 중인 모든 장치에 자동으로 연결할 수 있는 깔끔한 기능이 있습니다. 예를 들어, MacBook Pro를 사용 중이고 Tidal에서 재생 목록을 듣고 있지만 구식 전화를 받기 위해 iPhone으로 전환해야 하는 경우 AirPods의 연결이 함께 이동합니다. 묻지 않아도 쉽게 'iPhone으로 이동했습니다'라고 표시됨). 유용한 것 같죠?
음, 가끔은... 하지만 음악 연결을 유지하고 전통적이고 유서 깊은 방식으로 전화를 받기를 원할 수도 있습니다. 아름다움은 선택의 사치가 있다는 것입니다!
자동 연결을 켜거나 끄려면 설정, Bluetooth, AirPods 이름 옆에 있는 작은 'i' 정보 아이콘으로 이동하세요. 이제 '이 iPhone에 연결'을 탭하고 원활한 기기 전환을 위해 '자동으로'를 원하는지 또는 AirPods에 달리 지시할 때까지 현재 기기를 계속 사용하려면 '이 iPhone에 마지막으로 연결될 때'를 원하는지 선택하십시오. 짜잔!
3. AirPod를 사용할 때 Siri가 모든(또는 일부) 알림을 알려줍니다.
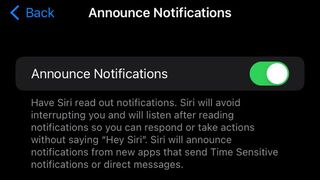
… 그리고 완전히 끊김 없는 음악을 원한다면 Siri도 무음으로 설정할 수 있습니다! 돈을 벌기 위해 Siri와 AirPods를 함께 사용하면 아름다운 파트너십이 형성됩니다. 우리처럼 당신이 곧 회의가 있다는 말을 들어야 하는 사람이라면 말입니다.
Thanks to iOS 15, Siri can actually announce all notifications to you, through your AirPods (and not just messages). You can turn it on or off, or customize which apps will be able to send notifications for Siri to verbalize into your ears by heading to Settings > Announce Notifications (under the Siri tab) and then toggle it on to your preference; you can have it on entirely, so it'll apply to your HomePod and/or Apple CarPlay too, for example, or just for your headphones.
4. Deploy spatial audio – with head-tracking if your source device supports it
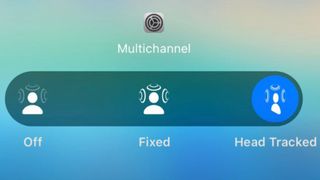
You absolutely ought to take advantage of Apple's proprietary and immersive three-dimensional audio answer to Dolby Atmos for headphones – and for that, you need to check that it's actually on.
A quick way to do this is to go in to your iPhone or iPad's Control Center with your AirPods connected, and long-press that volume-slider widget. From here, Spatial Audio will pop up in the bottom-right corner. You can toggle it off, on, or (the best bit) apple Apple's top-tier head-tracked spatial audio, if you are using AirPods 3, AirPods Pro, or AirPods Max and you're listening to supported music on an iPhone, iPad, Mac with Apple silicon, or Apple TV 4K.
5. Make AirPods Pro call-quality better with Conversation Boost

This is an AirPods Pro-only thing (although if you don't have a set of those, we emphatically direct you to Voice Isolation, your iPhone, iPad and Mac's secret setting to massively boost call quality) but it can really augment and improve the sound clarity when call handling.
As the name suggests, Conversation Boost is designed to help people hear conversations better, and it uses the beam-forming microphones (also used in noise cancellation) on the AirPods Pro to boost the volume of the person talking to you.
이 추가 기능을 사용하려면 AirPods Pro가 최신 펌웨어로 업데이트되었는지 확인한 다음 iPhone 또는 iPad의 설정으로 이동하여 접근성을 탭한 다음 오디오/시각으로 스크롤하십시오. 이제 헤드폰 조절을 켜고 투명도 모드로 조금 아래로 스크롤하십시오. 마지막으로 Conversation Boost 옆의 스위치를 녹색 켜짐 위치로 전환하면 모든 설정이 완료됩니다!
새롭게 최적화된 AirPods의 성능을 발휘할 적절한 콘텐츠가 필요하십니까? 물론입니다. Apple Music의 Spatial Audio에서 들어야 할 10개의 앨범을 확인해 보세요 . 팟캐스트가 더 마음에 드시나요? 2022년 최고의 팟캐스트 선정을 확인하세요 . 즐기다!